
How to Reupholster a Leather Chair
This post contains affiliate links. As an Amazon Associate, we earn from qualifying purchases.
Reupholstering a leather chair is a straightforward process that you can easily accomplish with the right tools and techniques. Begin by gathering essential tools such as scissors and a staple gun. Flip the chair over and carefully remove old staples while wearing safety glasses. Check the frame for stability and assess the padding condition. Next, cut your new leather and drape it over the chair, securing it in place with tacks. Finally, finish by securing everything together, and your chair will look like new. For those interested, I’ll provide more detailed tips and insights throughout this article!
Essential Facts in 30 Seconds
- Remove old upholstery carefully, saving pieces as templates for new fabric.
- Check the chair frame and padding for stability, damage, and comfort.
- Drape new leather over the frame, ensuring proper tension and alignment.
- Staple the leather securely, starting from the center to avoid wrinkles.
- Reassemble the chair, ensuring screws are tight and testing for comfort.
Tools and Preparation
Reupholstering a chair requires the right tools. Start by gathering essential items. An upholstery regulator helps tuck fabric neatly. A magnetic tack hammer makes tacking easy. Heavy-duty scissors are important for clean cuts. A measuring tape ensures accurate dimensions. Specialized cutting tools like heavy-duty scissors and ergonomic shears enhance the quality of your cuts. Make sure to include a staple gun for securely attaching the new fabric.
Additionally, a staple gun and staples is crucial for ensuring that the new upholstery remains firmly in place. A replacement gas cylinder is also essential if you need to fix any hydraulic issues during your project.
Sewing supplies are also necessary. Use upholstery needles and strong thread for sturdy seams. A glue gun works well for securing trim. Proper techniques make your chair comfy and stylish.
Stretch webbing tightly with special pliers for the best results. Spills happen, but they can be cleaned up easily. Treat them as a chance to improve your cleaning skills. Enjoy your reupholstering project!
Removing Old Upholstery
Get your tools ready. It’s time to remove the old upholstery!
Flip the chair over. Check the bottom for fasteners like staples and nails. Use pliers or a flathead screwdriver to take them out carefully. These tips will help you remove them smoothly! Wear work gloves to protect your hands from sharp bits. Remember that old fabric is typically attached with staples, so be cautious when removing it. A thorough cleaning process before you begin will ensure you don’t miss any hidden fasteners. Additionally, cleaning the area around the tear can help ensure a better reupholstering outcome.
As you pull off the leather panels, cut along the edges. This helps keep the frame safe. Remember to save the old pieces. They can be templates for your new fabric. Reupholstering is simpler than it may seem, so don’t hesitate to dive into the process!
If some parts tear, don’t worry. Focus on keeping the shape. Keep all screws and hardware organized for easy reassembly later.
If a stubborn staple won’t budge, give it a little nudge. You’re doing great!
Chair Frame and Padding Assessment
Before starting to reupholster your chair, check the frame and padding carefully.
Look for cracks or damage on the frame. Make sure it feels sturdy. A wobbly chair isn’t safe. Additionally, regular maintenance can help prevent future issues with the chair’s frame. Inspecting the legs for stability is crucial to ensure overall safety. A thorough assessment of chair leg damage will help identify any underlying issues that need addressing.
Next, inspect the padding. Smells can indicate problems. Uneven spots can make the chair uncomfortable. A comfy chair brings joy. Padding evaluation is essential to determine if replacement is necessary for comfort.
Take your time with this assessment. It’s key for a successful reupholstery project.
A strong frame and good padding ensure happiness while sitting.
Inspect Frame for Damage
Inspect your chair’s frame for damage. This is an important step before reupholstering. Start with the material. Is it sturdy hardwood? Check for cracks, splits, or signs of rot. Look closely at the joints. Shake the chair gently. Does it wobble? Tighten any loose screws or nails. Additionally, ensure that the frame is in good condition to prevent future issues after reupholstering. Remember that a well-maintained frame can help prolong its lifespan and enhance the chair’s overall durability. A thorough inspection will also allow you to assess the damage accurately and decide if repairs are needed before proceeding with the upholstery.
Use this quick checklist:
| Inspection Area | What to Look For |
|---|---|
| Frame Material | Cracks, splits, or rust |
| Joints and Blocks | Looseness or detachment |
| Screws and Fasteners | Tightness and stability |
| Overall Stability | Wobbling or creaking sounds |
Now you’re ready to start your reupholstery project!
Assess Padding Quality
Giving your chair a fresh look starts with checking the padding quality. This step is very important. Press down on the cushions. Good padding springs back quickly. Check for even distribution. Lumps or gaps mean it’s time for an upgrade. Regular cleaning can also help maintain the padding’s integrity and inspect foam for damage to ensure optimal support.
Know the types of padding. Premium foam or down fill offers lasting comfort. Avoid thin polyfill. It flattens easily and loses support. Look for body impressions or strange noises. These are red flags. New foam from craft stores can enhance comfort and longevity.
Great padding keeps your chair comfy and stylish. Don’t skip this step. Your future self will appreciate it!
Address Odor Issues
Check the padding for odors in your chair. Sniff around the leather and upholstery. Don’t forget the seams and crevices. Musty smells may mean dampness is trapped inside. Regular dusting of the chair can help prevent odors from developing. Additionally, regular vacuuming to remove loose debris will help maintain a fresh environment.
Use a vacuum with an upholstery attachment to clean every inch. Pay extra attention to hidden spots.
For stubborn smells, sprinkle baking soda on affected areas. Let it sit overnight. Odors will disappear! Additionally, consider using an enzymatic cleaner designed for pet urine if the odor persists.
You can also mist a vinegar-and-water solution on the smelly spots. Just don’t soak them.
These tips will help your chair smell fresh and clean!
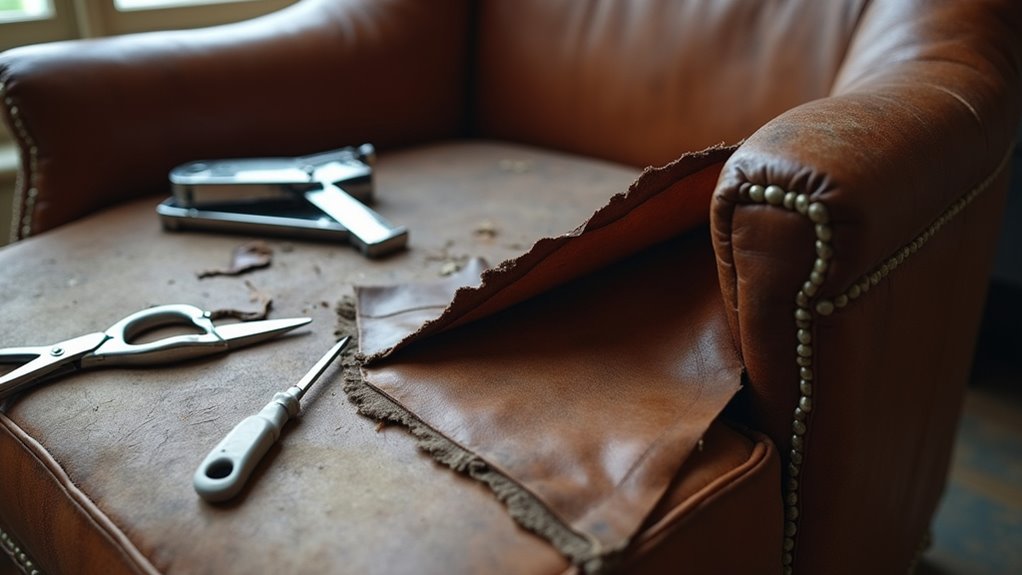
Cutting and Preparing Replacement Leather
Cutting and preparing replacement leather can be a fun project! Start by choosing the right type of leather. Aniline leather feels soft and luxurious. Pigmented leather is more durable.
Measure your chair carefully. Always add extra material for seams and corners.
Use sharp leather shears or a rotary cutter. Work on a stable surface for clean cuts. Mark your cutting lines with tailor’s chalk. This keeps everything neat and tidy. Additionally, consider adding extra batting if the existing padding is damaged, as this can enhance comfort.
For tricky corners, use a “Y-cut” to help with folds. Be gentle with the edges to stop fraying. If you need to bend the leather, a heat gun can help soften it. Additionally, cleaning the area before applying the new leather can improve adhesion and overall appearance.
With these tips, you can give your chair a fantastic new look!
Attaching New Upholstery
Transform your chair into a stylish masterpiece with new upholstery! Start by draping the leather over the frame. Make sure it aligns with the seams and edges. No one wants a lopsided chair!
Use contact cement for some stickiness. It allows you to reposition the leather easily.
Next, use temporary tacks on opposite sides. This will help you center the leather. Stretch it evenly and apply firm tension. This helps avoid pesky wrinkles.
Replace old tacks with staples for a cleaner look. Work from the center outwards. A staple gun or a magnetic tack hammer works best.
Leave space near the armrests for trimming later. You’re doing great! Soon, your chair will look like it belongs in a fancy magazine.
Keep going! You’re almost there!
Final Assembly and Maintenance
You’ve reached the final assembly. Great job! It’s time to put the chair pieces back together. Make sure everything is tight and secure. Test the chair for stability and comfort. Sit down only when you feel safe.
Caring for your chair is important too. Regular maintenance will keep it looking fresh and beautiful for years. Simple tips can help.
Clean it gently with a damp cloth. Avoid harsh chemicals. Check for loose screws or parts regularly. Taking these steps keeps your chair in great shape.
Enjoy your comfy, reupholstered chair!
Reassemble Chair Components Securely
Reassembling your chair is like completing a puzzle. Start by trimming any extra fabric or leather. Make sure the edges look neat.
Check for loose screws or damaged parts. Fixing these now helps with stable assembly later.
Align the seat and backrest using the original screw holes. Insert screws by hand to confirm the fit. Be careful not to cross-thread!
Once everything lines up, tighten the screws evenly. Don’t overdo it! Your chair should be sturdy, not a jigsaw puzzle.
Finally, check for any upholstery pinching. You’re almost done! Celebrate your hard work!
Test Stability and Comfort
Your chair is ready for testing! Start with stability. Check all joints and fasteners. They should be tight, with no wobbles.
Then, give the seat a gentle push. It should feel solid, like it can hold weight.
Next, focus on comfort. Sit down and feel the foam. No sagging should happen! Ensure the leather is smooth. Your back should align nicely with the seat. It should feel cozy and breathable.
Test it fully. If it passes the ketchup test, you definitely have a winner! Enjoy your sturdy, comfy chair!
Regular Maintenance for Longevity
You just reupholstered your chair. Now, keep it looking great with regular leather care.
Dust your chair weekly using a soft, dry cloth. A vacuum with an upholstery attachment works well for those hard-to-reach areas. For deeper cleaning, use a cleaner made for leather. Always do a spot test first to avoid damage.
Every 6 to 12 months, apply a high-quality leather conditioner. This helps keep the leather soft and supple.
Keep your chair out of direct sunlight and away from heat. Following these tips boosts your chair’s lifespan. Enjoy your beautiful chair for years to come!
Frequently Asked Questions
How Do I Choose the Right Upholstery Fabric?
Choosing upholstery fabric needs careful thought. Consider the type of fabric and how long it lasts. Comfort matters for your everyday use. Think about how easy it is to clean. Balance looks with how much wear the fabric will get. High-quality materials last longer. They also make your furniture look better. Good choices add value to your home. Pick colors and patterns that match your style. Remember, the right fabric makes a big difference.
Can I Reupholster Without Prior Experience?
Reupholstering furniture is possible without any prior experience. Start with simple projects. Look for easy reupholstery techniques. Online tutorials offer great step-by-step guidance. Take your time to learn. Be patient as you improve your skills and build confidence. Practice makes perfect. Enjoy the process of transforming your furniture!
What Tools Are Essential for Beginners?
Beginners need some key tools. A staple gun makes fastening easy. A tape measure helps with accurate sizing. Upholstery needles are great for sewing.
Gather essential upholstery supplies. Fabric scissors cut cleanly. A steam iron removes wrinkles quickly. With the right tools, your first project becomes much easier. Enjoy your upholstery journey!
How Much Does Reupholstering a Chair Cost?
Reupholstering a chair can cost a lot. Prices change based on size, material, and labor. You might pay between $50 and over $2,000.
Smaller chairs usually cost less. Larger chairs or complex designs cost more. The type of fabric also affects the price. High-quality materials raise the cost.
Labor costs can vary too. Some places charge more for skilled work. Always ask for quotes from different upholsterers. This helps you find the best price.
Consider the chair’s value. If it’s a family heirloom, spending more might be worth it. Reupholstering can give your chair a new life.
How Long Does the Reupholstering Process Take?
Reupholstering furniture takes time. For chairs, plan for 8 to 14 hours. Sofas need more time and effort. Your skill level matters too. Some chairs are simple, while others are complex. The harder the project, the longer it will take.
Stay prepared for a fun, creative process. Enjoy transforming your furniture into something new!
Conclusion
Your leather chair looks amazing now. It shines like a new star. Your hard work turned something old into something great. Remember, keep it clean and safe. This way, it will stay beautiful for many years. You did this project like a true expert. If you need help with another DIY, just ask! Now, sit back and enjoy your beautiful chair!