
How to Fix a Leather Chair
This post contains affiliate links. As an Amazon Associate, we earn from qualifying purchases.
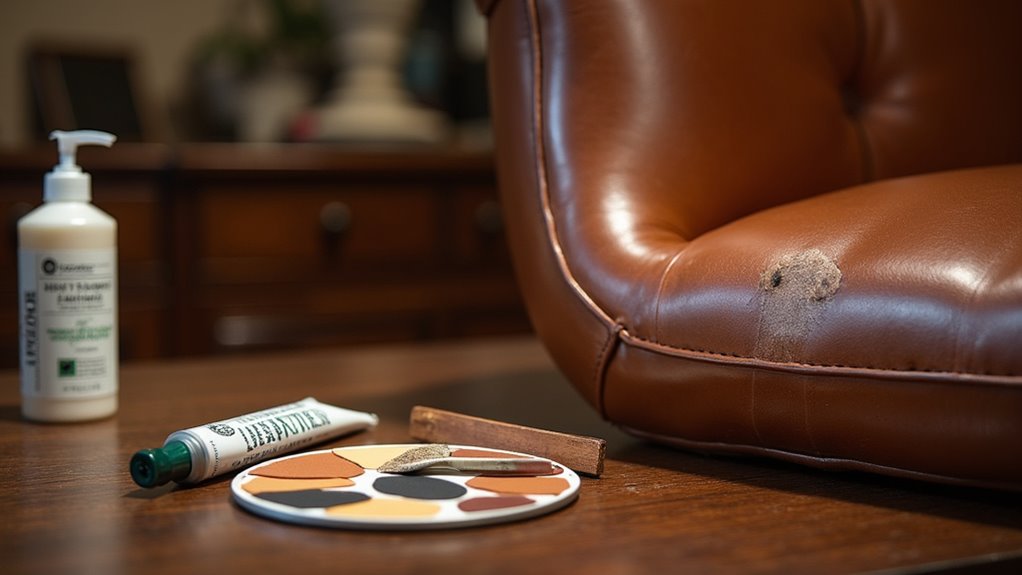
Fixing a leather chair is a straightforward process that can rejuvenate its appearance and extend its lifespan. Begin by inspecting the chair for tears and cracks, using a magnifying glass to catch any tiny details. Clean the damaged areas with rubbing alcohol, and trim any ragged edges for a tidy finish. For tears, apply flexible leather glue along with a sub-patch, and use leather filler for cracks. Finally, condition the leather to maintain its fresh look. For those interested in a deeper understanding, further explanation and supporting details will follow.
Essential Facts in 30 Seconds
- Inspect the leather for damage, noting tears, cracks, or discoloration.
- Clean damaged areas with rubbing alcohol and a soft cloth.
- For tears, trim edges, apply a sub-patch with leather glue, and match color with colorant.
- Hydrate surface cracks with leather conditioner and use filler for persistent issues.
- Seal all repairs with leather conditioner to protect the chair’s appearance.
Assessing the Damage to Your Leather Chair
Fixing a leather chair starts with assessing the damage. Think of it like being a detective.
Begin with a thorough inspection of the leather. Use a magnifying glass to spot scratches or gouges. Feel the surface with your fingers. Rough spots indicate wear. Press gently on the leather. If it sags, you may have structural issues. Look for color changes too. These can show signs of wear and tear. Properly assessing damage is crucial for effective repair. Additionally, cleaning the area around any damage with rubbing alcohol can help you see the true extent of the issue. It’s also important to gather materials before starting any repair work to ensure you have everything you need.
Make a list of what you find. Note the size and location of every blemish. Taking photos will help you remember the damage later.
Minor scratches are often easy to fix. Deep tears might need a professional touch. If your chair has a ketchup stain, don’t worry. Just assess the damage carefully.
You’re on your way to restoring your chair. Happy inspecting!
Repair Techniques for Tears and Holes
Check the damage on your leather chair. It’s time to repair those tears and holes. Use simple patching techniques to make your chair look great again. Here’s how to do it:
Trim any ragged edges. This gives a clean look. Remove loose fibers and debris. Assessing the condition of the leather surrounding the tear is crucial to ensure a successful repair. Proper cleaning the area before starting the repair can also enhance adhesion and effectiveness. Additionally, ensure that the surface is free from dirt for better adhesive bonding. It’s important to gather necessary supplies before beginning the repair process.
Cut a sub-patch. Make it about 1 cm larger than the tear. Use flexible leather glue to hold everything in place.
Finish by adding a colorant that matches your chair.
Prep the area well. Carefully insert the sub-patch. Apply your adhesive. Allow it to dry completely. For a seamless look, use leather filler if needed. For small tears, super glue works well too. Just remember, a little glue goes a long way.
With patience and these easy steps, your chair will look fresh and new!
Addressing Surface Cracks and Scratches
Surface cracks and scratches on your leather chair can be fixed easily. Start with a good leather cleaner and a soft microfiber cloth. Gently clean the cracks to remove dirt and oil. Let the leather dry completely. This helps products stick better. For optimal results, ensure the area is completely dry before applying any repair products.
Next, apply a rich leather conditioner. Use a soft cloth to work it into dry areas. Let it soak in overnight. This gives your chair the hydration it needs, which is essential for maintaining leather chairs. Regularly applying leather conditioner can help prevent further damage and keep your chair looking its best. Additionally, cleaning the area before applying any fillers or conditioners is crucial for effective repair.
For persistent cracks, use a specialized leather filler. Carefully apply it into the cracks and let it dry.
With these simple steps, your chair will look great again! Remember, a little care can make a big difference.
Fixing Peeling and Flaking Leather
After fixing surface cracks and scratches, focus on peeling and flaking leather. This problem often happens with faux or bonded leather, especially when it’s old. Here’s how to fix it:
- Clean the area with a soft cloth and a mild cleaner.
- Steer clear of strong chemicals; they can make the problem worse!
- Check the damage. Knowing the type of leather helps a lot. Assessing the damage is crucial for effective repairs, as different types require different cleaning solutions for optimal results.
- Use flexible leather repair adhesives to press down peeling edges and fill in gaps.
- For the best results, apply several thin layers of filler.
To keep your leather looking great, regular maintenance is essential. Proper cleaning techniques can significantly extend the life of your leather chair. With some effort, your chair can look like new again!
And remember, a little mess is just part of the crafting process!
Completing Your Leather Chair Repair
Completing your leather chair repair is easier than you think. Start by gathering your repair tools. You’ll need flexible leather adhesive and leather filler.
Clean the damaged area well. This removes dirt and oils. For tears, place a sub-patch underneath for support. Then, use the adhesive to secure it. For cracks, apply the filler to level the surface. Smooth it out with a card. After it dries, lightly sand it for a perfect finish. Regular maintenance can prevent future scratches and prolong the life of your leather chair. Conditioning the leather regularly helps maintain its hydration and flexibility.
Next, restore the color. Use a leather dye kit for faded spots. Apply it carefully and let it soak in. Regular conditioning can prevent future cracking and drying, ensuring your chair remains in great shape.
Seal everything with a leather conditioner. This keeps your chair looking great. Finally, clean your chair well. You’ve turned your chair from “oops” to “wow!”
Regular leather care keeps your chair happy and lasting longer.
Frequently Asked Questions
How Can I Prevent Future Damage to My Leather Chair?
To keep your leather chair safe and looking good, clean and condition it regularly. Avoid placing it in direct sunlight. This can cause fading and drying. Maintain a good level of humidity in the room. Too much dryness can harm the leather. If something spills on your chair, clean it right away. Use a soft cloth to gently wipe it. Treat your chair with care, and it will stay beautiful for years.
What Type of Leather Conditioner Should I Use?
Choose natural leather conditioners for gentle care and hydration. They help restore leather’s oils. No harsh chemicals are used. This protects the leather’s look and strength. Avoid synthetic conditioners. They can harm leather over time. Keep your leather items looking great with the right care.
Can I Use Regular Glue for Leather Repairs?
Regular glue is not good for leather repairs. It may stick at first, but it won’t stretch or bend. Leather needs special glue that can handle movement. Leather glue is designed just for this. It gives a strong hold while allowing flexibility.
Proper application is key. Clean the leather before applying glue. Use a thin layer for the best results. Press the pieces together firmly. Let it dry completely. This ensures a lasting repair.
Your leather items deserve the best care. Choose the right glue for better results. With the right tools, you can fix leather easily and effectively.
How Long Does the Repair Process Typically Take?
Repair time depends on how serious the damage is. Small problems can often be fixed in one day. Bigger issues take longer. They might take several hours to a few weeks. The time needed also depends on how complex the repair is and how long things need to dry. Always expect some variations in your timeline.
Is It Advisable to Hire a Professional for Repairs?
Hiring a professional for repairs is a smart choice. Their skills ensure high-quality work. This means your furniture lasts longer. Professionals know how to fix problems correctly. DIY repairs can lead to mistakes. Mistakes can cost more money in the long run.
Professional repair services protect your investment. They help keep the value of your furniture. In many cases, paying a bit more upfront saves money later. The right expert can restore your items to like-new condition. This is especially true for valuable or antique pieces.
Trusting a professional means peace of mind. You can be confident in their work. It’s worth it to have someone experienced handle your repairs. You will see the benefits in the long term.
Conclusion
You’ve completed those leather chair repairs! You should feel proud. Many people, over 60%, own leather furniture. You’re not alone in this! With some patience and the right methods, your chair can look brand new. Each scratch tells a story, but now it’s a story of your hard work. Celebrate your success! Sit back, relax, and enjoy your amazing chair.