
How to Fix a Hydraulic Chair From Going Down
This post contains affiliate links. As an Amazon Associate, we earn from qualifying purchases.
To fix a hydraulic chair that keeps sinking, first check the height adjustment lever for proper functionality. If it’s jerky, try flipping the cylinder to redistribute lubricant. Next, loosen the bolts to remove the seat and access the cylinder. Tap the cylinder gently with a rubber mallet to loosen it, then replace it with a heavy-duty class 4 gas lift. Finally, test everything to ensure smooth operation. For those interested in more detailed explanations and tips, further information will follow.
Essential Facts in 30 Seconds
- Inspect seals and O-rings for wear; replace damaged parts to prevent leaks.
- Check the height adjustment lever for proper functionality.
- Flip the cylinder upside down to redistribute lubricant for better lifting.
- Lubricate joints with high-grade grease to minimize friction.
- Test the chair for leaks and smooth height adjustment after repairs.
Diagnosing the Hydraulic Chair Issue
Check if the chair lifts smoothly. A jerky lift can mean there’s a problem inside. A sudden loss of lift? That may point to a seal issue.
Inspect the seals and O-rings. Cracked or worn parts need replacement. This keeps your chair in good shape. Additionally, flipping the cylinder upside down may help redistribute lubricant and restore functionality. Furthermore, ensure the height adjustment lever is functioning properly to prevent further issues. Regularly checking the gas lift cylinder can also help maintain optimal chair performance. A well-maintained chair not only functions better but also reduces the risk of chair instability.
Also, monitor your hydraulic fluid levels. A well-functioning chair requires the right amount of fluid.
Grab your tools and fix your chair!
Accessing and Removing Hydraulic Components
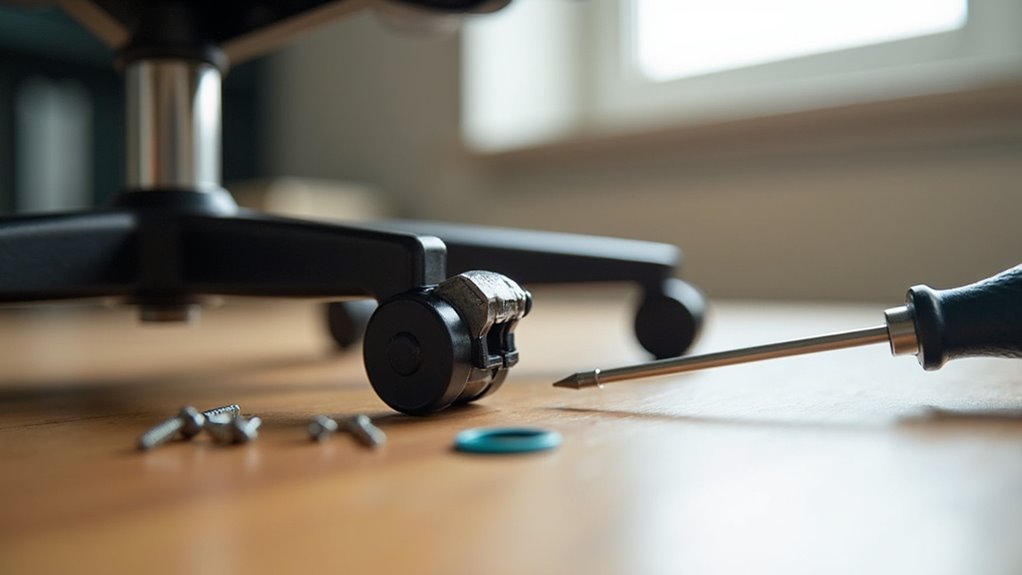
Get your hydraulic chair ready for some care! First, gather the right tools. A sturdy wrench will help you remove the chair seat from the base. Make sure your chair is stable and won’t tip over. The hydraulic lift mechanism is essential for ergonomic seating, so pay close attention to its condition during the repair process. Additionally, ensure you check warranty status before starting the repair.
Now, follow these steps to take out the cylinder. You’ll feel like a pro! Start by loosening the bolts. Then, carefully lift the seat off. Next, detach the cylinder from the base, and inspect the gas cylinder for any visible damage or wear.
Keep everything organized. This will make it easier to put back together. Enjoy working on your chair!
Tools Needed for Disassembly
Fixing a hydraulic chair is easier with the right tools. These tools are essential for your repair journey. Organizing them helps keep your workspace safe. Here’s what you need:
| Tool | Purpose |
|---|---|
| Large pipe wrench | Loosens the cylinder |
| Rubber mallet | Dislodges stuck parts gently |
| Regular wrench/socket set | Removes screws and nuts |
| Flathead screwdriver | Opens flat nuts on the mechanism |
Wear gloves and goggles for safety. Understanding how to take apart a chair makes the task simpler. It’s also important to be aware of pneumatic cylinder issues that may arise during the repair process. Regularly inspecting the chair for signs of wear and tear can help prevent future problems. Additionally, maintaining the chair can prolong the life of its components. Now, let’s get started on your repair!
Chair Positioning Techniques
Getting your hydraulic chair ready for repairs is easy with the right techniques! Follow these steps for stability and ease:
- Flat Surface: Set your chair on even ground. This prevents wobbling.
- Lock Wheels: Secure the wheels to stop any sudden movement.
- Ergonomic Height: Adjust the chair to a comfortable height. This helps your back and lets you reach the hydraulic parts easily. Proper chair height adjustment is crucial for maintaining comfort and support while you work, ensuring that your knees form a 90-degree angle for optimal posture. Additionally, proper positioning plays a vital role in reducing strain during repairs.
Tilt or recline the chair gently for a better view underneath. Use a flashlight for extra light.
With this setup, you’ll fix that chair like a pro in no time. Get started and enjoy the process!
Cylinder Removal Steps
Removing the cylinder from your hydraulic chair is easier than it seems. Start by gathering your tools: a rubber mallet, a pipe wrench, and gloves.
Tilt the chair to see the base clearly. Hold the chair firmly. Tap around the cylinder’s edge with the mallet to loosen it. If it’s stuck, use some lubricant. This helps, just like adding sauce to a burger!
Once the base is off, take the pipe wrench. Grip the cylinder tightly and turn it. Tap it gently if needed to keep it aligned.
Stand back while you tap. Soon, the cylinder will be out and ready for a new one or to be fixed. You’ve got this! High-five!
Lubrication and Temporary Restoration Techniques
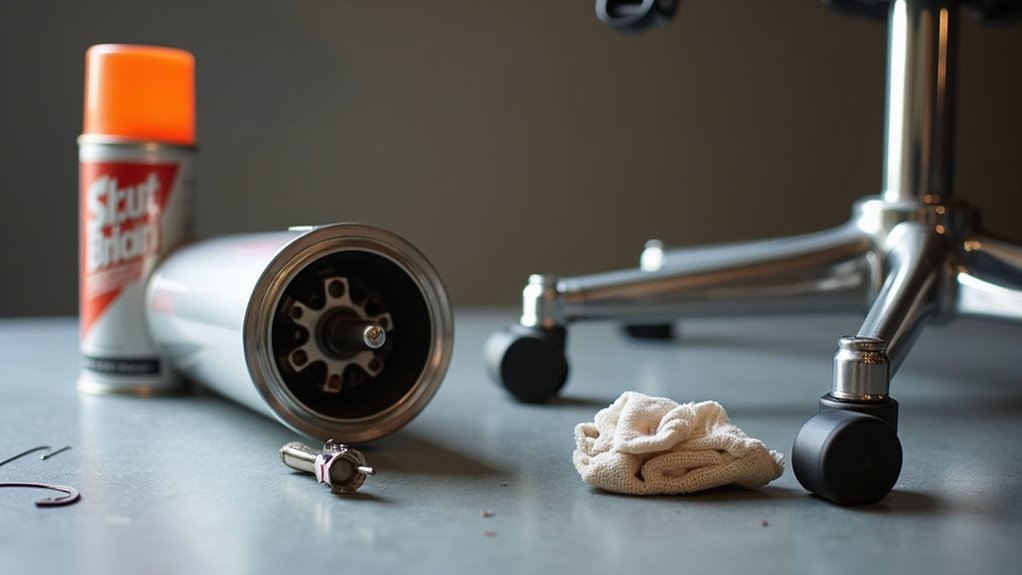
To keep your hydraulic chair working well, proper lubrication is essential. Use high-grade synthetic or lithium grease for the best results. Additionally, lubricating joints can help reduce creaking noises that may arise over time. Regularly checking for loose screws can also prevent further issues with the chair’s mechanism.
Check the chair’s position while you work. This helps the mechanism operate smoothly. Don’t forget to raise and lower the chair regularly. This action helps prevent sticking parts.
Give your chair a little exercise! Regular maintenance will keep your chair in top shape. A well-lubricated chair lasts longer and feels better. Additionally, regular maintenance can prolong chair lifespan and functionality.
Take care of it, and it will take care of you!
Proper Lubrication Methods
To keep your hydraulic chair functioning well, proper lubrication is essential. Select silicone-based lubricants for the best results. Oil-based lubricants attract dust and dirt, which can cause problems.
Start by lifting the chair seat to access the cylinder area. Clear away any debris for effective lubrication. Spray or apply the lubricant directly at the base of the cylinder. Gently wiggle the chair to help spread the lubricant.
After applying, let the lubricant soak in for a few minutes. Test the chair to ensure it moves smoothly. This lubrication is a temporary fix. Always watch for any larger issues that may arise.
Happy fixing!
Chair Positioning Techniques
Keep your hydraulic chair in great shape.
First, check the chair height. A sinking chair? Use hose clamps around the cylinder to hold it up.
Need a quick boost? Insert some PVC spacers for a fixed height.
Clean dirt and hair around the hydraulic pump. A clean pump works better. Regularly check for the retaining clip that secures the base to ensure it’s in good condition.
After cleaning the piston, add some high-grade grease. Move the chair up and down to spread the grease.
Additionally, regularly lubricate moving parts to maintain optimal function and prevent future issues.
With these simple tips, your chair will feel like new. Enjoy your comfortable seating!
Cycling Mechanism Benefits
A hydraulic chair that doesn’t cycle smoothly can be fixed easily.
Understanding the benefits of the cycling mechanism helps improve performance. Here are some simple steps to enhance lubrication:
- Use Silicone Spray: A quick spray can help stuck parts move freely.
- Grease Tilt Joints: Apply grease to the hinge points. This makes your chair feel softer.
- Clean the Cylinder: Wipe off dust and add light lubricant. This improves pressure flow.
These actions boost your chair’s performance. Adjustments will feel smooth and easy.
Keep your chair in great shape for comfy sitting!
Inspecting Seals and Maintaining Hydraulic Fluid
Fixing a hydraulic chair starts with checking the seals and maintaining the hydraulic fluid.
Seal inspection is crucial. Look for O-rings under the chair base in the hydraulic pump. Check for cracks or leaks. These seals are essential for keeping hydraulic pressure. Replace damaged seals with new ones. For barber chairs, use seals that are usually 25mm.
Fluid maintenance is next. Make sure the hydraulic fluid is at the right level. Too little fluid makes the chair move slowly. Too much fluid can cause leaks.
After changing the seals, refill the pump with the correct hydraulic fluid. Regular checks keep your chair gliding smoothly, like a ninja on roller skates!
Cylinder Replacement Procedure
After checking the seals and the hydraulic fluid, it’s time to replace the hydraulic cylinder. Grab your tools and let’s get started!
- Choose the Right Cylinder: Pick a heavy-duty Class 4 gas lift cylinder. This ensures durability.
- Prepare Your Workspace: Protect your surface. Gather a large pipe wrench, rubber mallet, and gloves.
- Installation Tips: Clean the area where the new cylinder will go. It will help with a snug fit.
Begin by removing the chair seat. Use the pipe wrench to loosen the old cylinder. Gently tap it out.
Make sure the new cylinder aligns perfectly. After inserting it, secure it with clips or pins.
Reassemble your chair and you’re done! Adjust the height to your liking and enjoy your comfy seat. Great job on fixing it!
Testing and Verifying Repairs
Testing and verifying repairs is key to making sure your chair works well. Start by checking for leaks around the hydraulic cylinder. Spot a leak? Time to troubleshoot.
Adjust the height of the chair several times. It should move smoothly. Next, add weight to the chair. It must hold up without sinking.
Verification is just as important. Check the hydraulic fluid level and its condition. Make sure it matches the manufacturer’s specs. After filling it up, test the chair again. It should function properly now.
Look at the seals and gaskets. Any signs of wear or damage? Fix those to ensure a good repair.
Finally, reassemble the chair. Do some extended use tests. If the chair stays at the right height, you did a great job! Celebrate your success—you just fixed that chair like a pro!
Frequently Asked Questions
How Long Does a Hydraulic Chair Typically Last?
A hydraulic chair usually lasts between 7 and 10 years. This depends on how often you use it and the chair’s quality. To make your chair last longer, clean it regularly. Avoid putting too much weight on it. Try not to change the height too often. Keeping these tips in mind can help you get the most out of your chair.
Can I Use Any Lubricant for My Chair?
Using the right lubricant for your chair is important. Not all lubricants work well with every type of chair. Different materials need different kinds of lubricants. For example, hydraulic chairs require specific lubricants to keep them working smoothly.
Using the wrong lubricant can damage your chair. It can lead to squeaks or even broken parts. Choosing the right product ensures your chair lasts longer. Always check the manufacturer’s guidelines for the best lubricant. Proper care keeps your chair comfortable and functional.
Is It Safe to Use a Chair With a Leaking Cylinder?
Sitting on a chair with a leaking cylinder is risky. It can lead to sudden drops or even breakage. This can cause serious injuries. Comfort levels also drop when the chair is unstable.
It’s best to replace a leaking chair right away. A safe chair keeps you comfortable and secure. Don’t take chances with your safety. Get a new chair for peace of mind.
What Tools Are Essential for Hydraulic Chair Repair?
Repairing a hydraulic chair requires some important tools. You will need wrenches, screwdrivers, and lubricants. These tools help fix common issues like height adjustment and leaks.
Proper techniques are key to maintaining your chair. They ensure it works well for a long time. Regular maintenance keeps your chair functional and safe.
Always use safety gear while working. This protects you from any accidents. With the right tools and care, your hydraulic chair will last longer.
Where Can I Find Replacement Hydraulic Components?
Find replacement parts for hydraulic components at online stores. The Office Oasis and Alibaba offer a variety of options. Check specialized suppliers for salon chair parts too. Always confirm that parts fit your specific chair model before buying. This ensures you get the right components for smooth operation.
Conclusion
Fixing your hydraulic chair is easier than you think! With some simple tools and a bit of effort, you can stop it from sinking. First, check the gas cylinder. This is the part that controls the height of the chair. If it’s broken, you can replace it.
Next, try using a hose clamp. This can help keep the chair at your desired height. Just place the clamp around the cylinder and tighten it.
Cleaning the chair is also important. Dust and dirt can cause problems. Wipe it down regularly to keep it working well.
Don’t forget to check the base. Make sure it’s stable and not damaged. A strong base supports the chair better.
With these steps, your chair will feel like new again. Sit comfortably and enjoy your work! You can do it!