
How to Fix a Tear in a Leather Chair
This post contains affiliate links. As an Amazon Associate, we earn from qualifying purchases.
Fixing a tear in your leather chair is a straightforward process that involves assessing the damage, applying a subpatch, and using leather filler for a smooth finish. For those interested in a more detailed guide, further explanations and supporting steps will follow.
Start by checking the size of the tear and cleaning the area thoroughly. Then, cut a subpatch and adhere it under the tear with glue. Use leather filler to fill the tear, layering until it’s smooth. Finally, texture the area with grain paper and match the color using dye. There’s more to learn about ensuring the repair lasts!
Essential Facts in 30 Seconds
- Assess the size and depth of the leather tear and check for frayed edges.
- Clean the damaged area with isopropyl alcohol or leather cleaner and let it dry.
- Insert a flexible subpatch beneath the tear and apply adhesive to the edges.
- Fill the tear with heavy leather filler in thin layers, drying thoroughly between each layer.
- Texture the repair area to match the original leather and finish with dye for color consistency.
Preparation and Assessment of the Damage
Before fixing that tear in your leather chair, assess the damage. Check how big the tear is. Is it a tiny rip or a deep cut? Look closely at the edges. Are they fraying or shredding? Trim any loose bits if needed. A deep tear means a tougher repair job. Additionally, consider the overall condition of the leather as this can affect your repair strategy. Next, clean the area around the tear. Use isopropyl alcohol or leather cleaner. This helps remove oils and dirt. A clean surface is important for strong adhesive, and it also ensures the repair looks seamless with the surrounding leather. Identifying the type of damage will also help you determine the best repair method. Remember that for larger tears, you may need a leather patch to ensure a more durable fix.
Make sure the area is completely dry before starting repairs. A clean canvas leads to a better fix. Now you’re ready to tackle that tear like a pro!
Subpatch Installation for Tear Repair
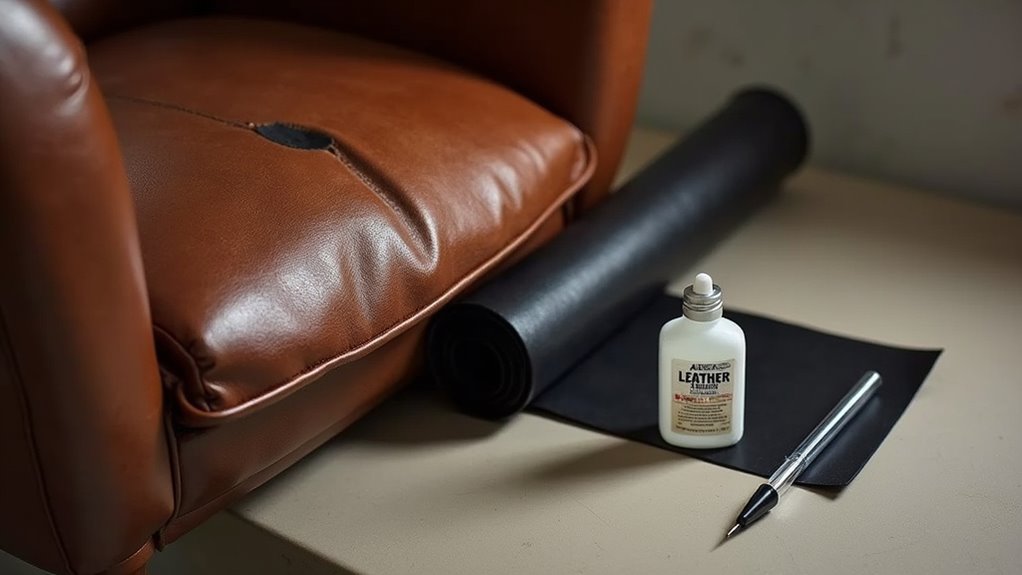
Your tear is clean and ready for repair. Let’s get started with subpatch installation!
First, choose your subpatch material. Use something flexible and strong, like lightweight fabric. Cut it a bit larger than the tear for good support. This step is essential for ensuring you have adequate support for the repair and helps to maintain the chair’s appearance over time. A good subpatch can help prevent future cracking by reinforcing the leather.
Next, insert the subpatch. Use tweezers or your fingers to slide it under the tear. Make sure it lies flat. No air bubbles or wrinkles allowed! Smooth out any creases with a blunt tool. Remember, it’s crucial to assess the damage before starting to ensure you have the right approach.
After that, apply a thin layer of flexible adhesive. Press the edges of the tear down firmly onto the subpatch.
Now, let the glue dry completely. Great job! Keep it up!
Filling and Layering the Repair Area
Filling and layering the repair area makes your leather look great! Start by cleaning the leather. Trim any rough edges to get a smooth surface. This is like preparing a blank canvas. Properly cleaning the leather also ensures that the surface is ready for the repair process. Additionally, ensure that the area is completely dry before applying any adhesive to prevent future damage. Using a damp cloth to remove dirt and oils is crucial for achieving the best results in leather repair.
Next, use a heavy leather filler. Apply it in thin, even layers. This helps control the thickness and prevents cracks. After each layer, dry it well. A hair dryer can help speed up drying. It’s like casting a magic spell! Remember to use heavy filler to fill the remaining gap after securing the patch.
Keep adding layers until the tear is about 75% filled. Then add a final smoothing layer. Feather the edges to blend with the leather around it.
With patience and care, your repair will look seamless. Your chair will be as good as new. Great job on your handiwork!
Texturing and Finishing the Repaired Surface
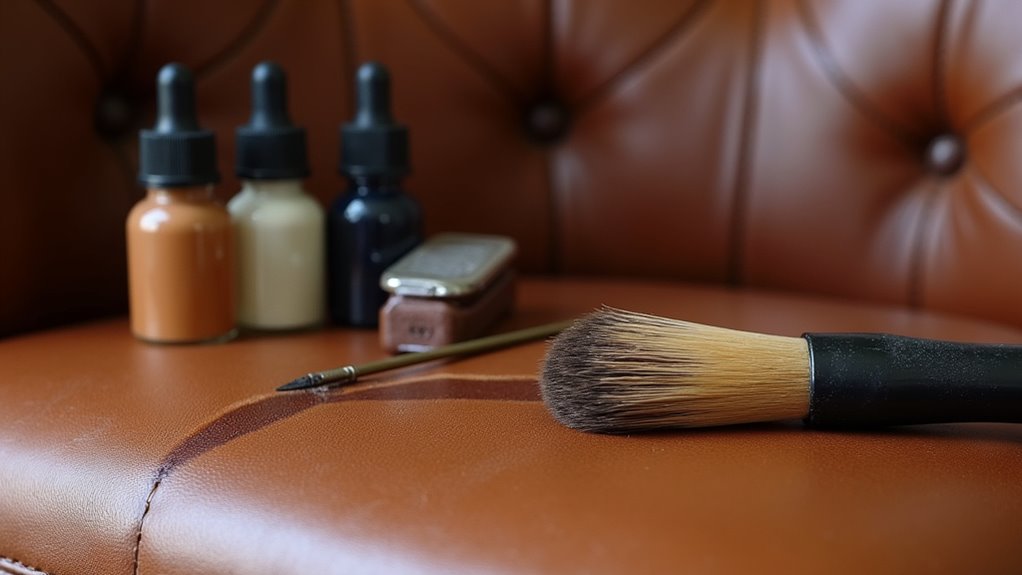
Great job on the repair! Now it’s time to make that patch blend in. Start by getting some grain papers. Press them lightly onto the repaired area. Use heat from an iron to create texture. This helps the patch look more natural. For a spray finish, apply it carefully. Avoid any messy spots.
Next, wear gloves and use brushes to blend the edges. Feathering the edges makes the repair mix with the original leather. If you notice uneven textures, sand them down with fine-grit sandpaper. Then, reapply filler as needed. Patience is important. You might need a few tries to get it just right. Additionally, ensure the area is completely dry before repair, as dampness can interfere with adhesive or repair products. Regularly apply a leather conditioner to maintain flexibility after the repair.
Finally, match the color. Apply thin layers of dye. Blend them gradually for a smooth finish. With these steps, your leather chair will look like new again. Great work!
Special Considerations for Different Leather Types
Fixing a tear in your leather chair? Knowing the type of leather is key. Different leathers need different care. Here’s a quick guide to help you:
- Aniline Leather: Use gentle adhesives. This leather is soft and stains easily, so quick action is important when dealing with any damage. Additionally, consider using a leather conditioner after repairs to maintain its softness.
- Pigmented Leather: Stronger adhesives work best. This type is tough and easy to fix. Regular cleaning and conditioning can help prevent future damage.
- Semi-Aniline Leather: Medium-strength adhesives are a good choice. It balances softness and durability. Ensure to test any cleaning solutions on a hidden area before applying them.
- Nubuck Leather: Use special suede glue. This keeps the soft texture intact. Proper maintenance, such as avoiding excessive moisture, is essential to preserve its appearance.
Additionally, always test cleaning solutions on hidden areas to prevent damage before attempting repairs.
With the right approach, your leather chair can look great again!
Frequently Asked Questions
How Long Does the Entire Repair Process Take?
The entire repair process takes about 6 to 7 hours. You will spend 1 to 2 hours on hands-on work. The drying time can add extra hours, especially with more layers. Each layer needs time to dry properly. This is crucial for a good finish. So, plan for the drying time to avoid delays. The more layers you apply, the longer the wait.
Can I Repair Leather Without Professional Help?
You can repair leather at home using simple methods. Small tears are easy to fix. Different types of leather need different care. Choose the right tools and materials for your leather type. For example, use leather glue for small cuts. For bigger tears, try leather patches. Follow the instructions carefully for the best results. With patience, you can make your leather items look good again. Enjoy your DIY project!
What Should I Do if the Tear Is Too Large?
For a large tear, patching techniques work best. Use strong repair materials to fix it. A professional can help with big damage. They can restore your leather well. This keeps the look and strength of your leather intact. Don’t wait too long to fix it. The sooner you act, the better the result will be.
How Do I Maintain My Leather Chair After Repair?
Maintaining your leather chair is easy. Use the right cleaning methods and conditioning products. This keeps your chair looking great. Regular care is important.
Clean your chair once a month. Use a soft cloth to wipe away dust. A gentle leather cleaner can remove stains. Always test cleaners on a small area first.
Condition your leather every few months. A good leather conditioner keeps it soft and prevents cracks. Apply it with a soft cloth and let it soak in.
Avoid direct sunlight. Sun can fade and dry out leather. Keep your chair away from heat sources too.
Spills happen. Quickly blot them with a clean cloth. Don’t rub the spill; it can spread.
With simple care, your leather chair will last for years. It will stay beautiful and comfortable for you to enjoy.
Are There Any Risks of Damaging the Leather During Repair?
Repairing leather can be tricky. Risks exist during the process. The wrong techniques can cause problems like discoloration or tearing. Using the right materials is important for a successful repair. Take time to assess the risks before starting. Avoid methods that may weaken the leather. With careful planning, you can repair leather without causing damage.
Conclusion
Fixing a tear in your leather chair can be a rewarding project. With some patience and the right tools, you can make it look great again. Follow these steps carefully, like baking a cake—layer by layer.
First, gather your supplies. You will need leather glue, a patch, scissors, and a clean cloth.
Next, clean the area around the tear. Use a soft cloth to remove any dirt or dust. This helps the glue stick better.
Cut the patch to fit over the tear. Make sure it covers the entire damaged area.
Apply the leather glue to the back of the patch. Press it firmly onto the tear. Hold it in place for a few minutes.
Wipe away any excess glue with a clean cloth. Let it dry completely. This may take a few hours.
Once dry, you can apply a leather conditioner. This helps the patch blend in with the rest of the chair.
Now, your chair is ready to use again! Enjoy your hard work and the beautiful chair. You did it!