
How to Reupholster a Chair for Beginners
This post contains affiliate links. As an Amazon Associate, we earn from qualifying purchases.
Reupholstering a chair is a straightforward and enjoyable project that can breathe new life into your furniture. To begin, gather your essential tools: a staple gun, scissors, pliers, and a measuring tape. Remove the old upholstery with care using pliers, then measure and cut your new fabric, ensuring to add a few extra inches for seams. Start stapling at the center of the seat for an even fit, and remember to miter the corners for a polished finish. Once you’ve checked for comfort and tightness, you’ll have a beautifully refreshed chair! For those looking for more detailed tips and guidance, stay tuned for further information.
Essential Facts in 30 Seconds
- Remove old upholstery carefully using pliers and a screwdriver; wear gloves for safety.
- Measure each part of the chair and add 2 to 3 inches for seam allowances.
- Cut new upholstery fabric with sharp scissors, ensuring clean edges; check padding condition.
- Staple new fabric from the center, pulling it taut and alternating sides for even tension.
- Create neat corners while stapling and inspect for comfort, stability, and visible staples or wrinkles before finishing.
Preparation and Tools Needed
Tackling a reupholstered chair is fun! Start with the frame. Check if it’s strong and has no cracks. Tighten any loose joints and fix damages.
Next, gather your tools. You need a staple gun, scissors, and pliers. Keep everything organized. This saves time when you need something. It’s also helpful to have a measuring tape on hand to ensure accurate cuts. Make sure to have a staple gun ready, as it is essential for attaching the new fabric securely. Additionally, having extra staples on hand can help ensure your new fabric is securely fastened.
Remove old staples and clean the frame. This gives your chair a fresh start! For extra comfort, add webbing or springs. Assessing furniture condition is crucial before beginning the reupholstering process.
Safety is important. Work in a well-lit area. Use gloves for sharp tools. Enjoy the process!
Follow these steps, and you’ll make that chair fabulous, just like magic!
Removing the Old Upholstery
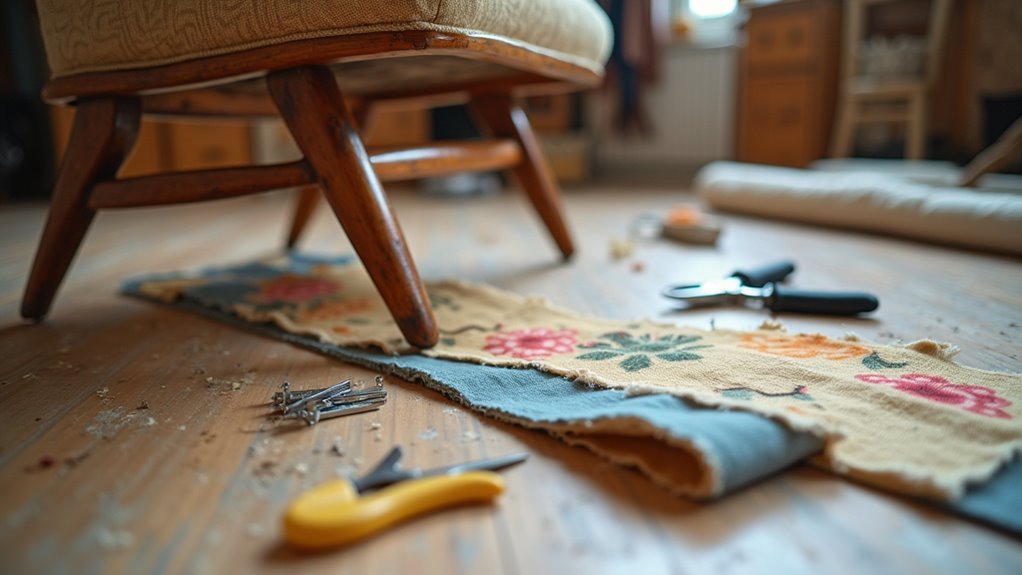
Start by removing the old upholstery from the bottom of the chair. This area hides the outer fabric and dust cover. Use pliers and a flat-head screwdriver to pull out staples and tacks. Wear gloves to protect your hands from sharp objects. Proper preparation is essential for achieving a professional finish during your upholstery project. Additionally, you can inspect the condition of the cushioning to determine if it needs replacement. As you take off the layers, make sure to carefully pull out staples to avoid damaging the underlying foam. It’s also advisable to replace worn-out foam padding if necessary for a comfortable seat.
As you take off the layers, take photos. This will help you put everything back together later. Here’s a quick reference table:
| Step | Action | Tip |
|---|---|---|
| 1. Outer Layers | Remove outer fabric | Keep it for template use |
| 2. Support Material | Find burlap underneath | Mark edges for easy reference |
| 3. Padding | Inspect and clean | Decide if you need repairs |
Follow these steps carefully. Enjoy your upholstery project!
Measuring and Cutting New Fabric
Measuring and cutting new fabric is simple. Start with a flexible tape measure. Measure the inside back, outside back, arms, and seat. Add extra fabric for seam allowances. This extra helps avoid a tight fit. Remember, accurate fabric estimation is crucial to ensure you have enough material for your project, so always account for fabric yardage needs. Additionally, it’s important to consider new foam when measuring, as worn foam may need to be replaced for comfort. A good practice is to ensure you have durable fabric that can withstand the wear and tear of kitchen use. It’s also wise to inspect padding condition to determine if additional cushioning is necessary for comfort.
After measuring, make a cutting plan. This keeps everything organized. Think of cutting like pizza. It’s better to have a little too much than not enough.
Be careful and precise. Use sharp scissors or a rotary cutter for clean edges.
Enjoy the process. With practice, you’ll become a pro in no time!
Accurate Measurement Techniques
Getting the right measurements for your chair reupholstery project is like solving a fun puzzle. It’s easier than it seems! Follow these steps to get it right:
- Measure the widest and longest points of the chair. Focus on the seat and back sizes.
- Add 2 to 3 inches for fabric allowances. This helps you wrap the edges securely.
- Use a flexible tape measure. This tool helps capture curves and corners accurately. Accurate measurements are crucial for ensuring that your new fabric fits perfectly without any bunching. Take your time to ensure precision, as measuring old fabric can also serve as a valuable reference for comparison when cutting your new piece.
Measure each part separately. Check the seat, back, and any overlaps. Mark important points on templates. This will guide your cutting.
Also, be sure to measure old fabric for reference when cutting your new piece to ensure a proper fit.
You can do this! Soon, that old chair will look fabulous and new!
Fabric Cutting Tips
Before cutting your fabric, set everything up properly. Lay your fabric flat and align the selvages. Use weights to keep it steady. Sharp tools make a big difference in your results. Follow this guide for successful cutting:
| Step | Action | Tip |
|---|---|---|
| 1. Measure | Use a ruler or template | Double-check everything! |
| 2. Mark | Use fabric chalk or pens | Keep marks visible and easy to remove! |
| 3. Cut | Use sharp scissors or a rotary cutter | Cut slowly for clean lines! |
| 4. Check Grain | Align with the grain direction | This prevents stretching! |
| 5. Plan Layout | Sketch your layout before cutting | This saves fabric and avoids waste! |
Taking time to smooth fabric during the stapling process helps avoid puckering, ensuring a professional finish. Additionally, using upholstery fabric that is durable and stylish will contribute to the chair’s longevity and overall appearance. It’s also important to ensure that you have enough fabric to cover the entire chair, allowing for extra inches for stapling. With these steps, you are ready to cut your fabric like a pro!
Applying the New Fabric
Give your chair a stylish makeover with new fabric! This process is exciting. Follow these simple steps for a great result:
- Start at the Center: Staple the fabric starting at the front center of your chair seat. This keeps the fabric tension balanced as you work. Make sure to attach the upholstery tightly to ensure a secure fit. Additionally, ensure that your fabric is suitable for upholstery to guarantee durability.
- Keep It Taut: Pull the fabric gently to avoid wrinkles. Stretch it evenly before each staple. Use your whole hand for better grip.
- Alternate Sides: Staple on one side, then move to the opposite side. This helps keep everything even and stops bumps from forming. Remember to create mitered corners for a clean finish as you work on the edges.
Enjoy your beautiful, newly upholstered chair!
Handling Corners for a Smooth Finish
Handling corners well makes a big difference. Aim for sharp and tidy corners, just like a gift! Start with some simple techniques.
For rounded corners, staple the fabric at the center and pull tight. Make small pleats by folding the fabric outward. Spread them out evenly to avoid bunching. It’s important to secure the fabric tightly to maintain a polished look.
For corners, fold the fabric like wrapping a gift. The “sail” fold gives a nice look. Keep the bulk low and the style high! Use staples to hold those folds down. Make sure no staples cover any screw holes.
After stapling, trim excess fabric, but leave a bit of overhang for safety. Check the foam condition to ensure comfort and support. Smooth everything out. Check for wrinkles. Celebrate your work! Those corners look fantastic!
Final Touches and Inspection
You’ve done an amazing job so far! Now it’s time for the final touches and inspection to make your chair shine. Follow this list to ensure your hard work pays off:
- Trim and Secure: Trim any extra fabric. Tuck corners neatly. Use your upholstery tools to make edges tight. No sagging allowed!
- Final Inspection: Check for even fabric tension. Make sure patterns are aligned and corners are flawless. Look for visible staples or wrinkles. Your chair deserves a smooth finish.
- Safety Checks: Look for sharp edges and loose staples. Check for cracks in the wood. Safety is important!
After these steps, your chair is ready for its big debut!
Testing for Comfort and Sturdiness
Testing for comfort and sturdiness is crucial. You want your chair to feel cozy and supportive.
Start with comfort. Sit down and notice how it feels. Is it soft or firm? Press the cushions. They should bounce back quickly and not stay flat.
Next, check for sturdiness. Gently flex the frame to find weak spots. Sit down and listen for creaks or wobbles. Unsteady legs are a big warning sign.
Look closely at the upholstery seams. If they shift or come apart, your chair needs extra care. A sturdy chair means comfort for you.
Take your time with this step. It’s worth it!
Frequently Asked Questions
How Do I Choose the Right Fabric for My Chair?
Choosing fabric for your chair is important. Think about how long it will last. Strong fabric works best in busy areas. Check how it fits with your room’s colors. Pick shades that match your style. This makes your space look great. Also, consider how easy it is to clean. Some fabrics stain easily, while others resist dirt. Comfort matters too. Soft materials feel good when you sit. Choose something that makes your chair inviting. Take your time to find the right fabric. Your chair deserves it!
Can I Reupholster a Chair Without Removing the Old Fabric?
Reupholstering a chair without taking off the old fabric is a smart idea. It’s like giving an old friend a fresh look. This method saves time and effort. You can achieve a beautiful chair transformation this way.
Start by cleaning the old fabric. This will help the new fabric stick better. Use a good quality adhesive. Choose a fabric that matches your style. Bright colors or patterns can change the whole vibe of the chair.
Cut the new fabric to size. Make sure it fits well over the old fabric. Use a staple gun to attach it tightly. Smooth out any wrinkles as you go.
Don’t forget to finish the edges neatly. This gives your chair a polished look. With this method, you can easily update your furniture. Enjoy your newly refreshed chair!
What Tools Are Essential for Beginners?
For your upholstery project, start with a staple gun. This tool secures fabric tightly. Next, grab a pair of fabric scissors. These scissors help you cut fabric accurately. Clean edges make a big difference. A professional finish will impress everyone. Using these tools ensures your chair looks great!
How Much Fabric Do I Need for Different Chair Types?
Measuring chair dimensions can be tricky. Different types of chairs need different amounts of fabric. For standard chairs, you need about 2.25 yards. Armchairs require more, around 4 to 7 yards. Lounge chairs need even more fabric, about 7 to 9 yards. Always remember to buy extra fabric just in case. This way, you’ll have enough for any surprises.
Is It Worth Reupholstering Versus Buying New Furniture?
Reupholstering furniture can give it a new life. It often costs less than buying new pieces. Quality restoration can make your furniture last much longer. New furniture sometimes breaks or wears out fast. This means you may need to replace it often, which adds up.
Choosing to reupholster is smart for your wallet. You can keep your favorite pieces while saving money. Plus, you can pick new fabrics and colors. This way, your furniture will look fresh and fit your style.
Think about your old furniture. Is it sturdy? Does it have good bones? If yes, reupholstering is a great option. You can enjoy your beloved pieces for years to come.
Conclusion
You’ve turned that old chair into something new! Imagine sinking into your beautiful creation. Feel proud of what you made. If you see a wrinkle, just smooth it out. Grab your tools and get ready to enjoy your comfy chair. You might even inspire others to reupholster chairs too! Celebrate your success!